Help & FAQ — Getting Started
Everything runs in your browser using your own GitHub account. Your keys and data never touch our servers. Here's how to set up and use Resume Engine Pro.
① The basic flow
- Create a profile (My Profiles) — upload your résumé or type your details once.
- Generate (Generate) — pick your profile, paste a job link or description, choose an AI engine.
- Publish & track — publish a portfolio and log applications in the tracker.
② "Some résumés don't auto-fill"
We auto-extract name, email, skills and experience from PDF, DOCX and TXT. Some files can't be read automatically — password-protected/secured PDFs, scanned images, or unusual layouts. When a field stays blank, just type it in manually (or use Manual Entry) — generation works the same either way.
③ AI engines — which to pick
- Free AI (Pollinations) — works instantly, no key. Good for a quick start.
- Browser AI (WebLLM) — runs a real LLM 100% on your device (WebGPU), $0 and fully private — nothing leaves your browser, no key, no token, no server. Needs a modern Chrome/Edge 113+ or Safari 18+; the first run downloads the model once (then cached). If your browser can't run WebGPU, you can also use Ollama (below) — it's free too. You still publish your resume & portfolio to a new repo in your own GitHub the same way.
- Ollama / Llama 3 (cloud) — free, private, runs on a throwaway GitHub runner. Needs a fork + GitHub token (see ④).
- OpenAI / Claude / Gemini / Mistral — highest quality, use your own API key (billed by them).
- None — local keyword matching, no AI.
Free models & prices. Browser AI (WebLLM) and Ollama are both $0. Best free picks:
- WebLLM —
Llama 3.2 · 3B(~2 GB, balanced default),Phi-3.5 mini · 3.8B(~2.2 GB, fast),Gemma 2 · 2B(~1.5 GB, lightweight),Qwen2.5 · 7B(~4.5 GB, best quality),Llama 3.1 · 8B(~5 GB, top quality). All $0 — you only "pay" a one-time model download + your device's RAM/VRAM. - Ollama —
llama3.2(3B, recommended default — fast & reliable on the free runner),qwen2.5:7b(best free quality),phi3.5,gemma2:2b. All $0 (public repo = unlimited free Actions minutes). Avoidllama3(8B) on the free runner — it can run out of memory.
④ Create a GitHub token (first-timers, read this)
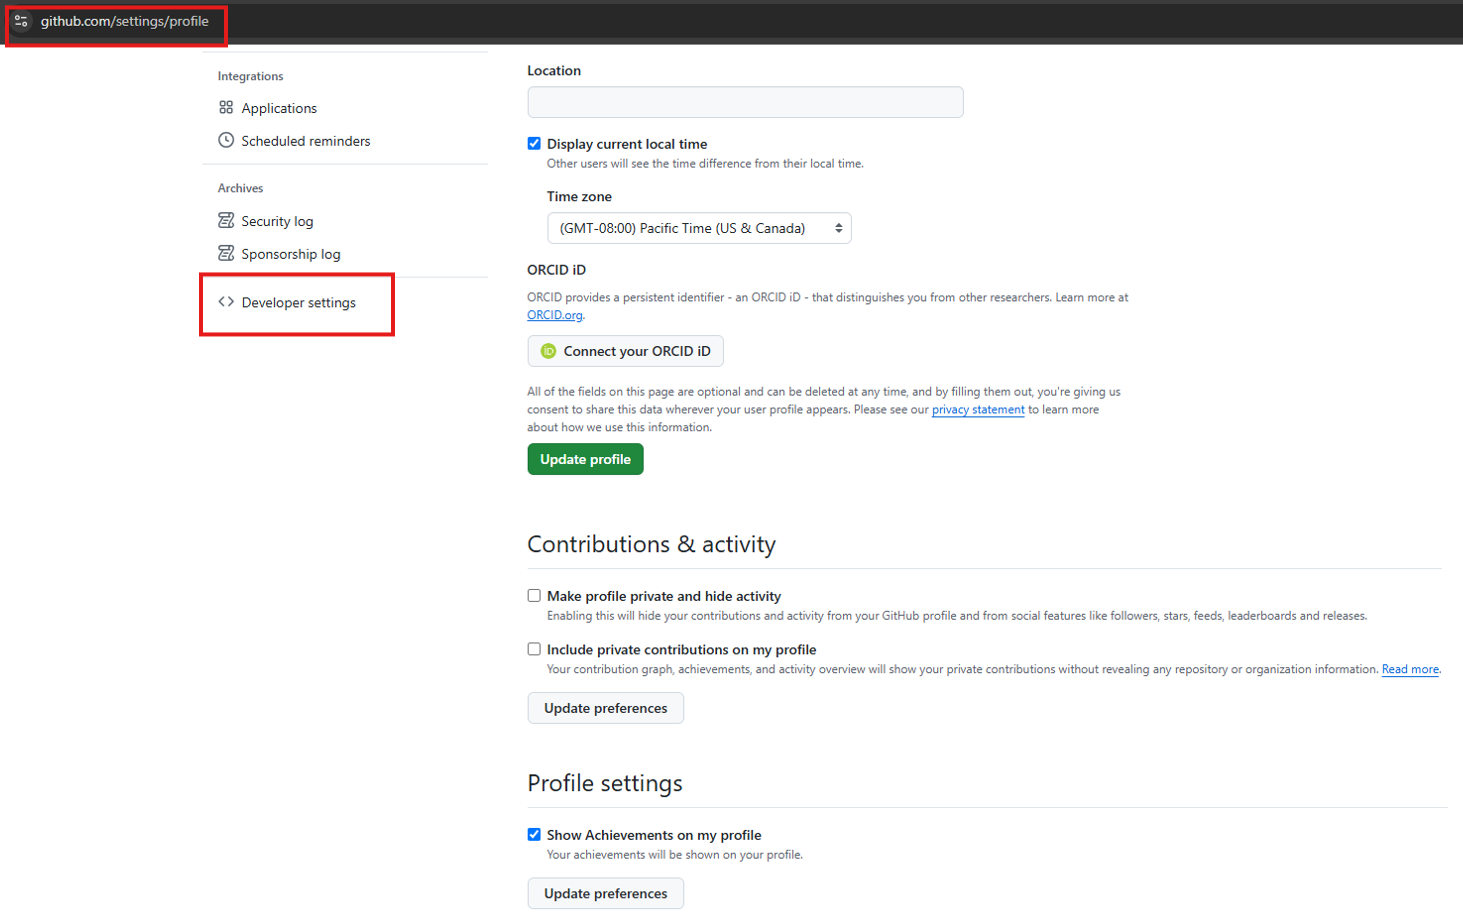
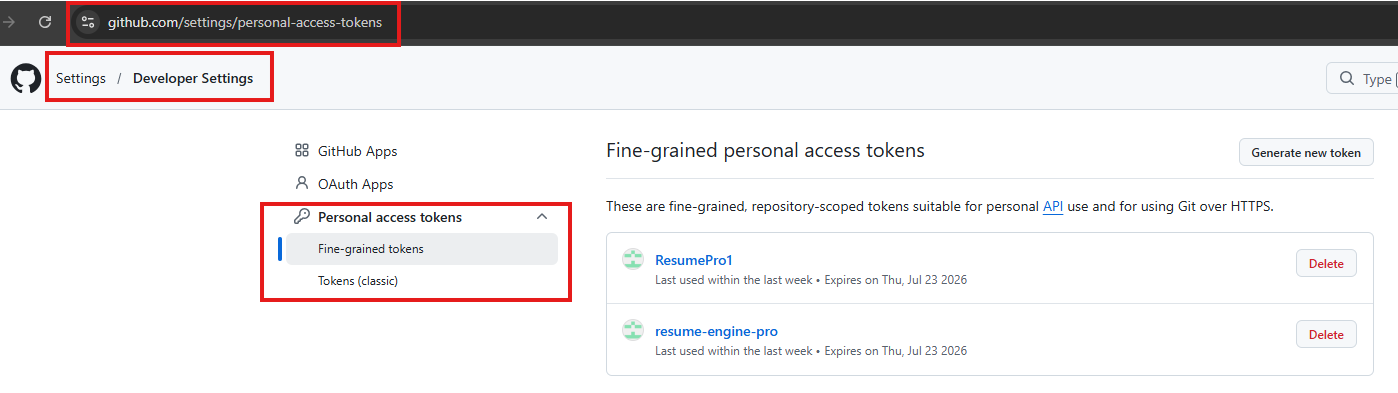
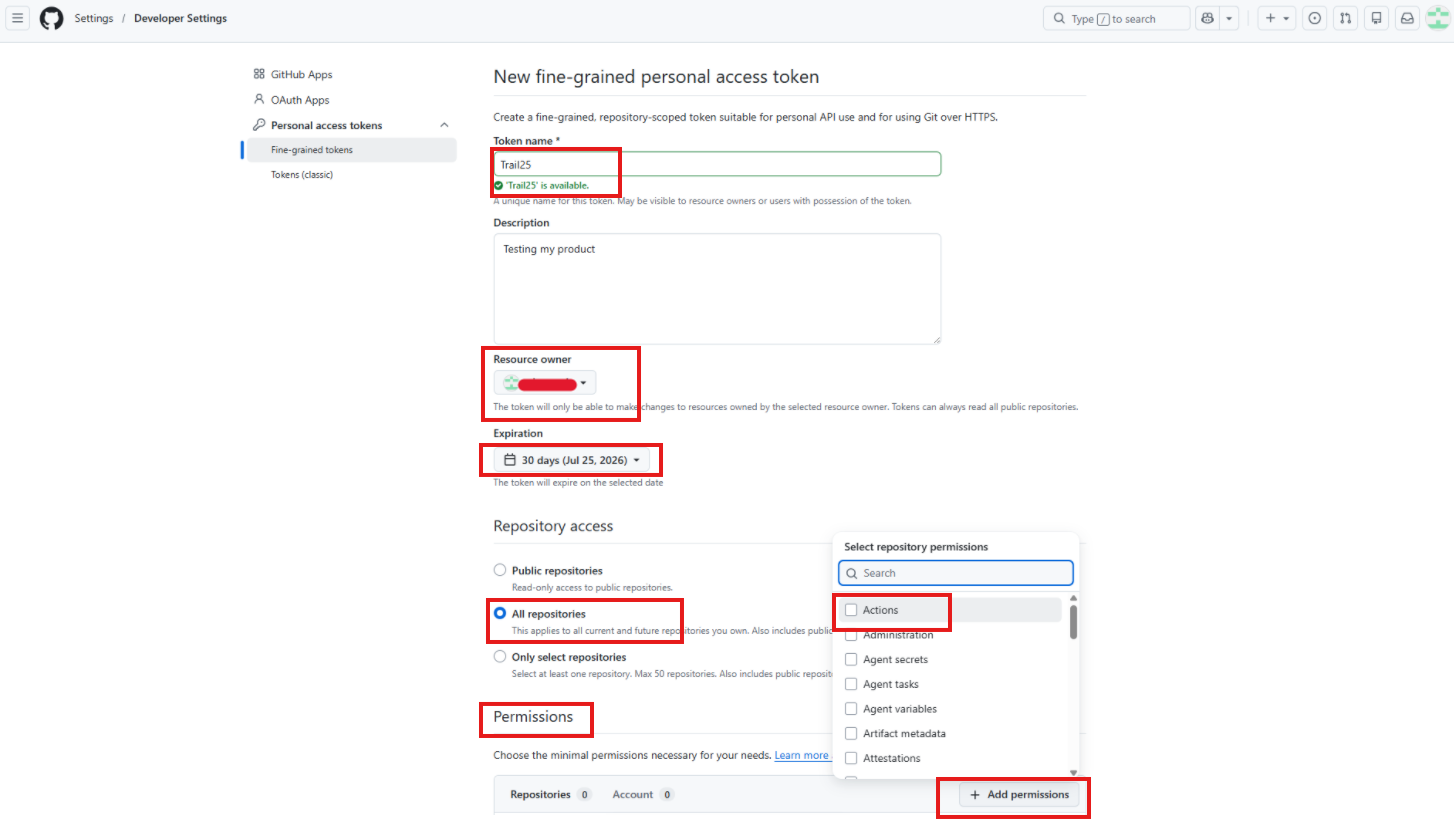
A token lets the app act in your GitHub account (host portfolios, run the free cloud generator, back up data). It's stored only in your browser. The screenshots below show each step.
- Go to github.com → Settings and open Developer settings (bottom of the left menu).
- Open Personal access tokens → Fine-grained tokens, then click Generate new token.
- Fill in Token name and an optional Description. Set Resource owner = your own account (the token can only affect resources owned by the owner you pick), choose an Expiration, and under Repository access select the All repositories radio. Selecting “All repositories” is what makes the Permissions appear below.
- Under Permissions → Repository permissions, set all three to “Read and write”: Actions, Contents, and Administration. (Administration: Read and write is what lets the app create repos — your fork and a data repo; without it you'll see a 403 “cannot create repository”. Metadata stays Read-only — it's required by GitHub, leave it as-is.)
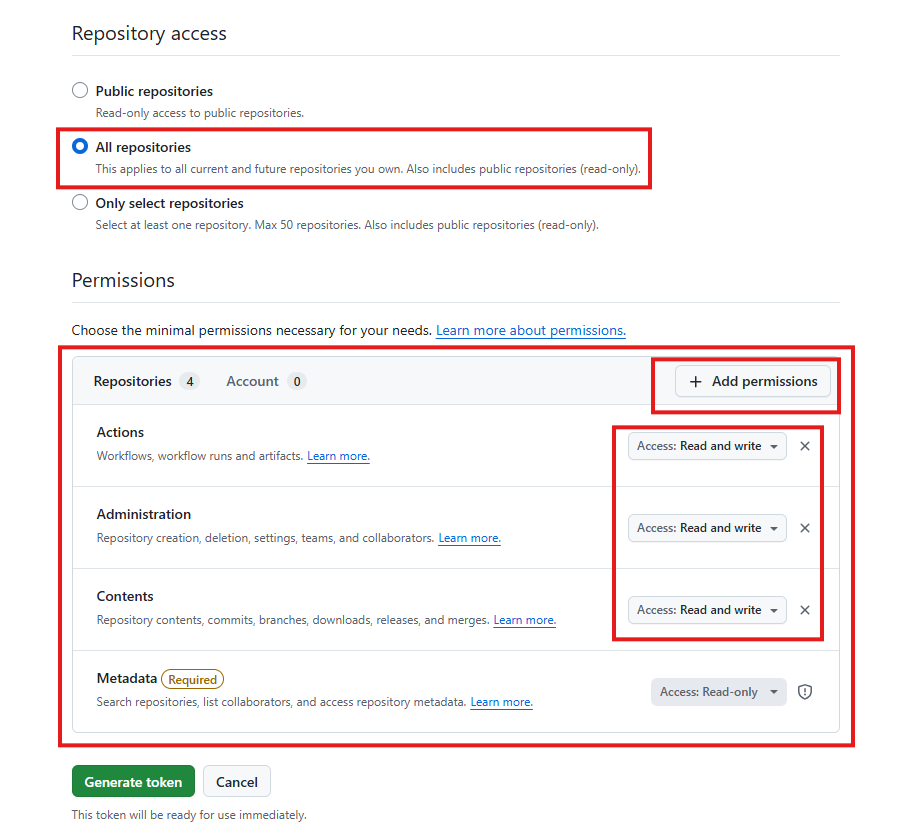
- Click Generate token and confirm in the dialog.
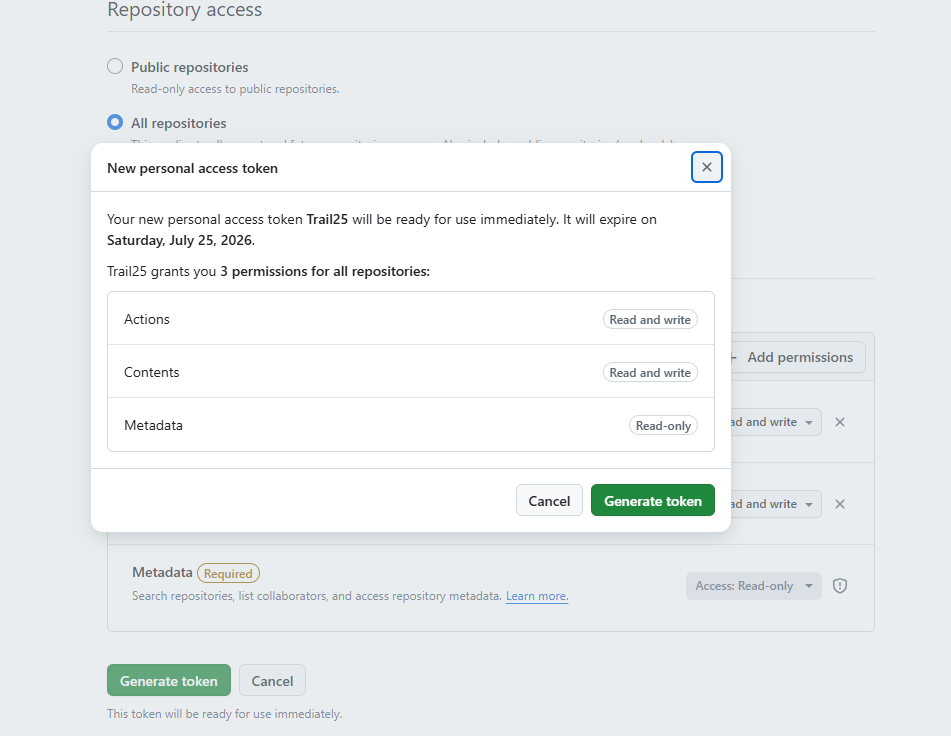
- Copy the token now (it starts with
github_pat_) — GitHub only shows it once. Paste it into Settings → Ollama in this app.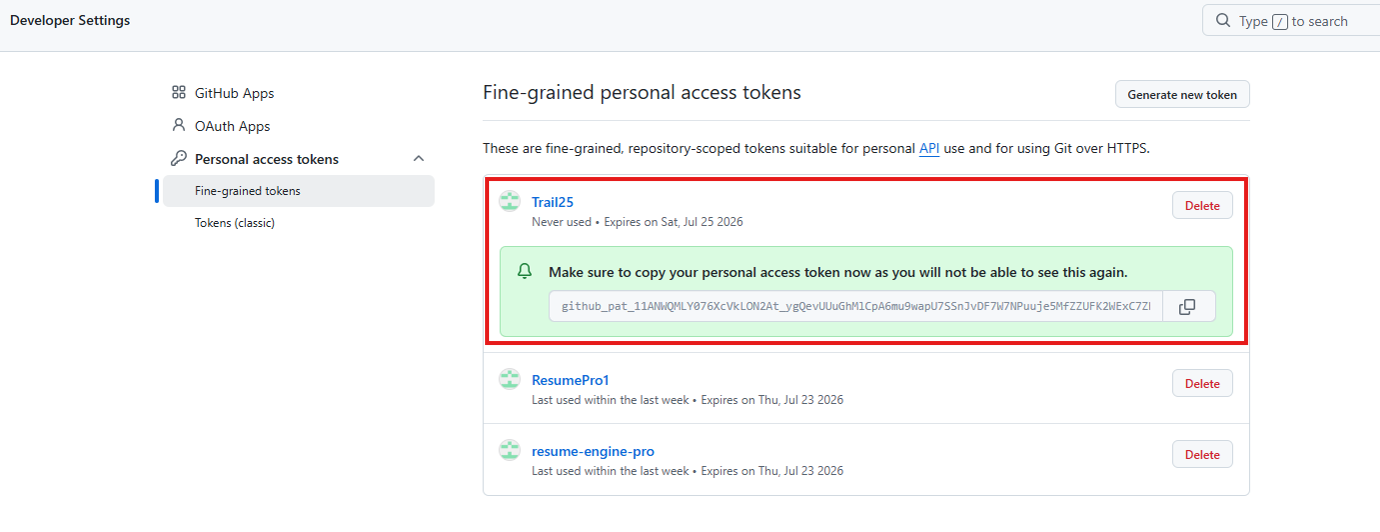
⚠️ Save the token somewhere safe if you want to reuse it (e.g. a password manager). If you lose it you can't view it again — you'd just create a new token (or regenerate). It's fine to have a couple of tokens, but delete any you no longer use to keep your account tidy and secure.
💡 Prefer a classic token instead? Create one with the repo + workflow scopes — that also works.
⑤ Use the free cloud generator (Ollama) in YOUR account
The free Ollama generator runs in your own GitHub account, so it never uses anyone else's resources. You need your own copy of the project (the workflow file). Easiest way:
- In Settings → Ollama, paste your token and click ⚡ Auto-create my cloud generator. This forks the project into your account and fills in your owner/repo automatically.
- Pick Ollama on the Generate tab and click Generate — a free, throwaway runner does the work and shuts itself down.
🔱 “Fork” vs “clone”: a fork is a copy of the repo inside your GitHub account — it includes the workflow and can run Actions, which is what the cloud generator needs. A clone is only a copy on your local computer and can't run the cloud job. So use Fork (the Auto-create button does this for you), not a local clone.
💰 No quota worries: the fork lives in your account and runs on your Actions minutes, which are free & unlimited for public repos. It never touches the original project's quota. You can keep the fork (it's free and ready for next time) or delete it whenever you like — your published portfolios live in their own separate repos and stay online either way.
⑥ Create a data repo / back up your data
In Settings → GitHub Configuration, type a repo name, choose Private/Public, and click Initialize Data Repository — it's created in your account. Then under Data Backup & Restore you can Download a backup or Save to GitHub, and restore on any device.
🌐 Keep published portfolio repos public. When you publish, the app creates a public repo so GitHub Pages can serve your live portfolio. If you later switch a published repo to Private, the live link stops working (Pages needs a public repo on the free plan).
⑦ "It couldn't fetch the job link"
Most job portals (LinkedIn, Indeed…) block automated reading, so the Fetch description button may fail — that's expected. Just paste the job description text. The link itself is still saved to job-details.md in your published repo.
⑧ Your privacy — and why there is no database
We are proud to run this with no backend database. We do not store your résumé, your profile, your keys, or anything about you on any server we control — because we never want to.
- Where your data actually lives: your profiles, history and API keys stay in your browser's local storage; anything you choose to publish or back up goes to your own GitHub account. You hold the keys, you can delete it all in one click, and it leaves with you.
- What we can see: nothing. There is no account on our side, no user table, no analytics profile of you, no tracking pixel. We could not sell or leak your data even if someone asked — we simply do not have it.
- The one server piece, explained honestly: the only server-side component is a thin proxy that forwards public job-board searches (so a key for a public jobs API is never exposed in your browser). It sees a search term and a city — never your résumé, your name, or your documents.
- No ads. No “free trial” that harvests you. No data broker. The free options are genuinely free because your own GitHub and your own browser do the work.
🌏 Why we build it this way. Your career data is deeply personal, and trust should be the default, not a paid upgrade. This is a small attempt at a better, kinder web — the kind of world we would want our children to grow up in, long after we are gone. If you are a fellow builder: you can ship something genuinely useful without ever holding a stranger's private data. Keep user data with the user — reach for a database only for shared, non-personal things (like caching public listings), never for people's private lives. 🙏
Practical tip: use Settings → Data Backup to download or save your data to your GitHub before clearing browser data.
Still stuck? Re-open this anytime via the ? button (bottom-right).